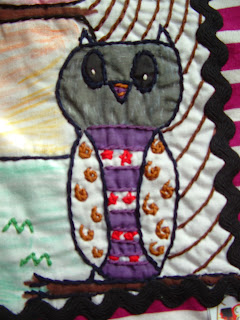
"Here mom, I want this on a shirt." said hastily by Emma as she hands me her art picture and runs ahead of me on our way home from art class. I am left looking at her art picture...they learned to draw owls...and try and figure out the best possible way to transfer a picture to a shirt we do not have in the least 'work for me' way.
 |
| Owl Art |
Luckily I knew just what to do....print the picture on fabric printer paper and iron on a shirt (we will need to get a white sweat shirt). No problem.......yeah right. First problem: a plain white sweat shirt could not be found in any of the gazillion stores we looked in at the mall. Emma decided this was good because she said it would look better on a sweater like the one we got from Old Navy only in a different color. Just so happens this sweater is her favorite and she has been asking for another one. However the idea wasn't too bad, the sweater is cute and cheap. We find one in a mulberry/white stripe that will go great with the colors in the drawing.
Second problem: After transferring the picture to the fabric I realized the printer ink is water soluble...in other words I will not be able to wash the shirt. A very active, loves to play outdoors, girl who will be wearing this shirt. No way can this work. Guess I can outline the shirt in embroidery thread. Took all weekend but I got it outlined. The colored in areas were a different problem. I can outline with a embroidery stitch but fill an area and my stitching shows it's flaws. Sharpies are great for this....why I did not think to use the Sharpies to outline the picture with I do not know, but it would have saved me 2 days of work and countless sticks to my fingers...and we happen to have the exact colors needed. I figured after washing, if the Sharpie colors start to fade she can just color them in again.
Third problem: The picture has areas where Emma used crayon to give it a setting sun look. Coloring this in with Sharpie would take away the crayon look. What to use? Time for a trip to Blick art store. Do you know they have fabric dyes in crayon form? Super neat and easy to use. The results looked exactly like the original art work. Best of all the dye gets set with a hot iron...just color and iron...permanent color.
With the picture now transferred to the shirt I encountered the last problem, it looked sort of plain and just stuck on the shirt. Guess I need to add a border. I found some large rick rack at Michaels and some cute Owl ribbon. I am happy to say the result turned out better then I planned.
 | ||
| Completed Shirt |
 | |
| Closer look |
 | |
| Even closer look |
Here are the supplies I used for the "simple" art to shirt project.
 | ||
| Supplies minus the embroidery thread |
Em loves the shirt (so all the hard work was worth it) and she has plans to wear it to her next art class. Hopefully that class will not produce another project for me to do.
No comments:
Post a Comment